funcinit(){ fmt.Printf("\nchorder.net/example/src2.go init() has been called.") }
funcSrc2(){ fmt.Printf("\nchorder.net/example/src2.go Src1() has been called.") }
编写代码调用这两个包中的方法:
packge_test.go
1
2
3
4
5
6
7
8
package main
import"chorder.net/example"
funcmain(){ example.Src1() example.Src2() }
执行结果:
1 2 3 4 5 6
>go run packge_test.go
chorder.net/example/src1.go init() has been called. chorder.net/example/src2.go init() has been called. chorder.net/example/src1.go Src1() has been called. chorder.net/example/src2.go Src1() has been called.
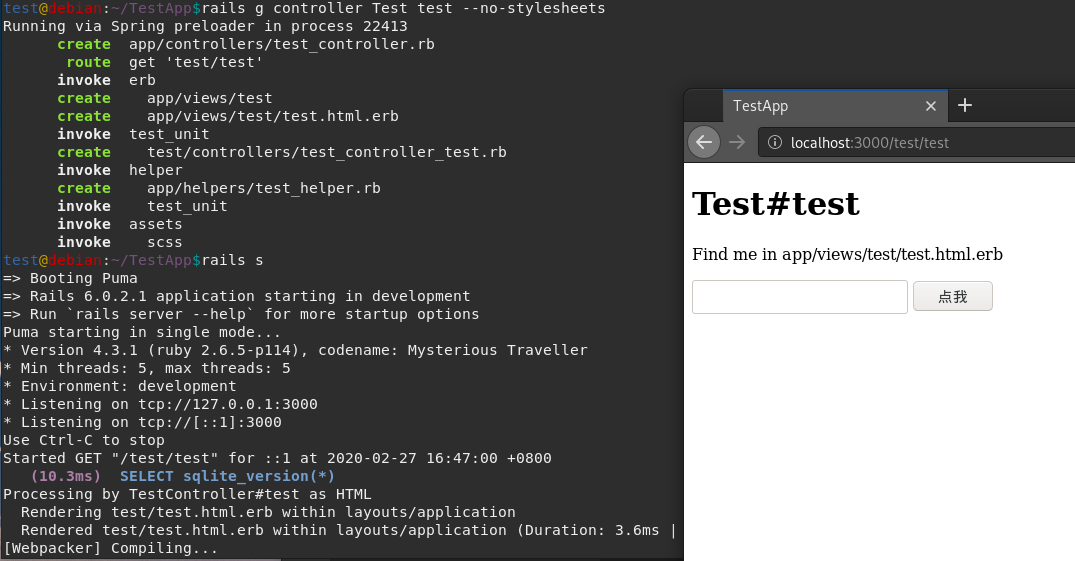
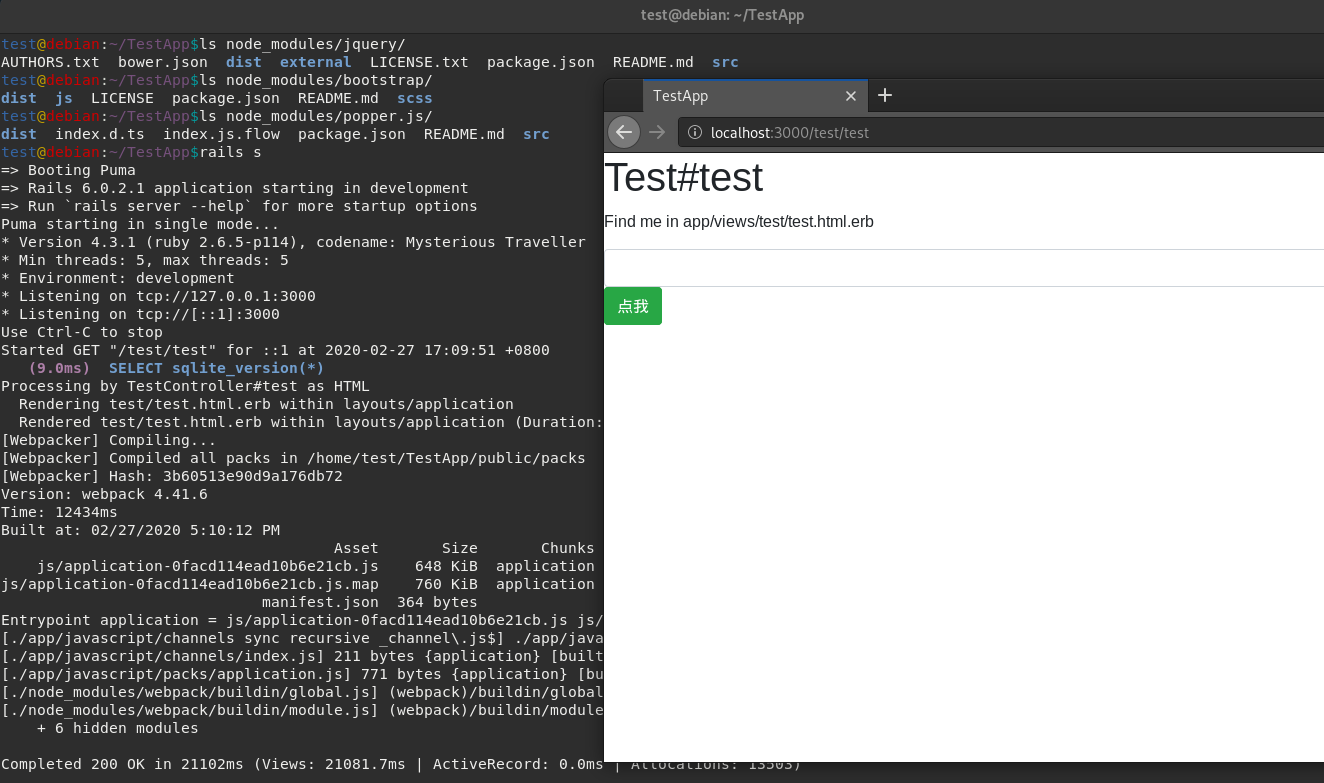
test@debian:~/TestApp$rails s => Booting Puma => Rails 6.0.2.1 application starting in development => Run `rails server --help` for more startup options Puma starting in single mode... * Version 4.3.1 (ruby 2.6.5-p114), codename: Mysterious Traveller * Min threads: 5, max threads: 5 * Environment: development * Listening on tcp://127.0.0.1:3000 * Listening on tcp://[::1]:3000 Use Ctrl-C to stop
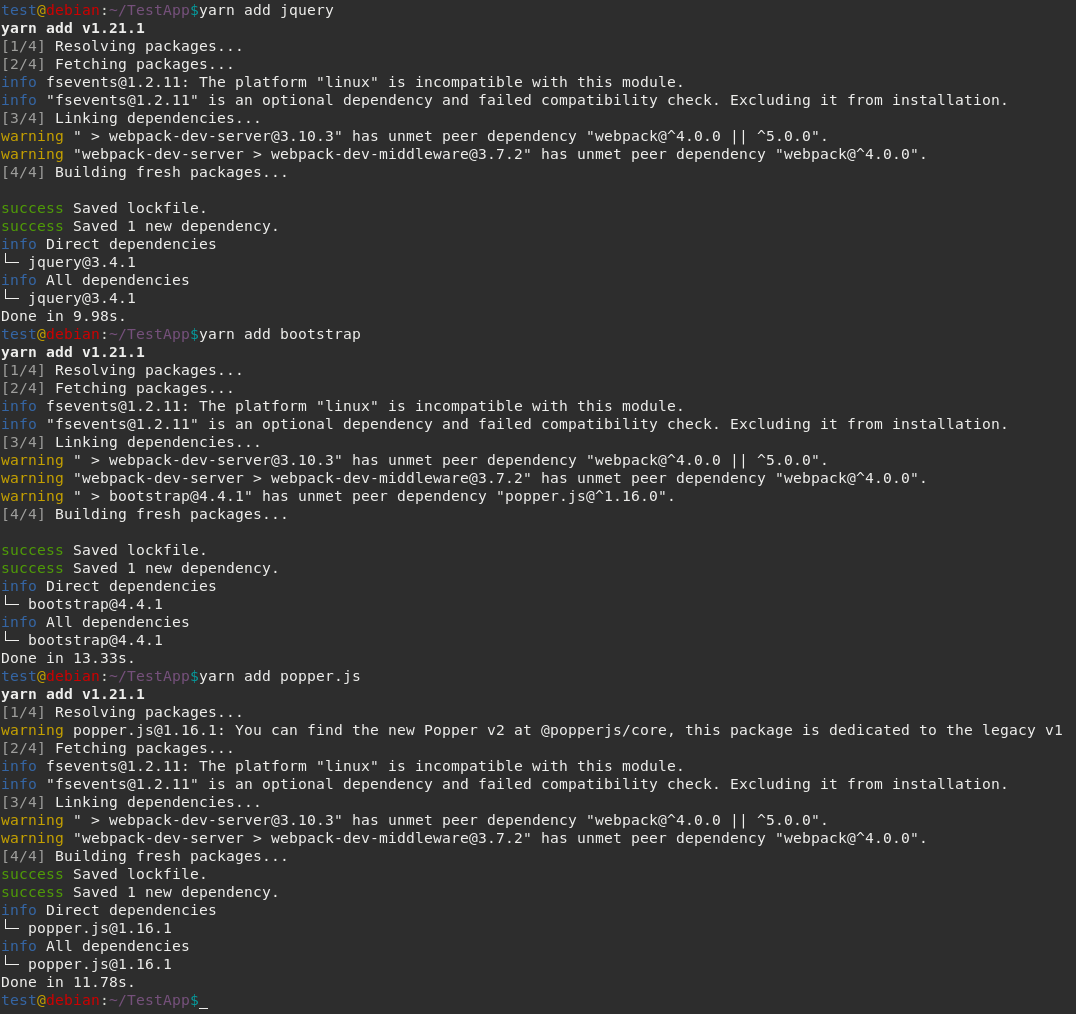
test@debian:~/TestApp$yarn add jquery yarn add v1.21.1 [1/4] Resolving packages... [2/4] Fetching packages... info [email protected]: The platform "linux" is incompatible with this module. info "[email protected]" is an optional dependency and failed compatibility check. Excluding it from installation. [3/4] Linking dependencies... warning " > [email protected]" has unmet peer dependency "webpack@^4.0.0 || ^5.0.0". warning "webpack-dev-server > [email protected]" has unmet peer dependency "webpack@^4.0.0". [4/4] Building fresh packages...
success Saved lockfile. success Saved 1 new dependency. info Direct dependencies └─ [email protected] info All dependencies └─ [email protected] Done in 9.98s. test@debian:~/TestApp$yarn add bootstrap yarn add v1.21.1 [1/4] Resolving packages... [2/4] Fetching packages... info [email protected]: The platform "linux" is incompatible with this module. info "[email protected]" is an optional dependency and failed compatibility check. Excluding it from installation. [3/4] Linking dependencies... warning " > [email protected]" has unmet peer dependency "webpack@^4.0.0 || ^5.0.0". warning "webpack-dev-server > [email protected]" has unmet peer dependency "webpack@^4.0.0". warning " > [email protected]" has unmet peer dependency "popper.js@^1.16.0". [4/4] Building fresh packages...
success Saved lockfile. success Saved 1 new dependency. info Direct dependencies └─ [email protected] info All dependencies └─ [email protected] Done in 13.33s.
test@debian:~/TestApp$yarn add popper.js yarn add v1.21.1 [1/4] Resolving packages... warning [email protected]: You can find the new Popper v2 at @popperjs/core, this package is dedicated to the legacy v1 [2/4] Fetching packages... info [email protected]: The platform "linux" is incompatible with this module. info "[email protected]" is an optional dependency and failed compatibility check. Excluding it from installation. [3/4] Linking dependencies... warning " > [email protected]" has unmet peer dependency "webpack@^4.0.0 || ^5.0.0". warning "webpack-dev-server > [email protected]" has unmet peer dependency "webpack@^4.0.0". [4/4] Building fresh packages... success Saved lockfile. success Saved 1 new dependency. info Direct dependencies └─ [email protected] info All dependencies └─ [email protected] Done in 11.78s.
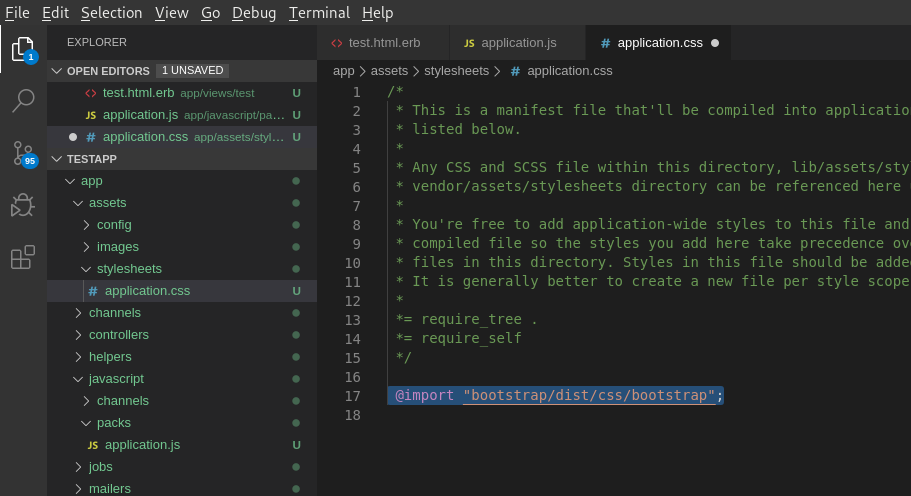
/* * File: app/assets/stylesheets/application.css * This is a manifest file that'll be compiled into application.css, which will include all the files * listed below. * * Any CSS and SCSS file within this directory, lib/assets/stylesheets, or any plugin's * vendor/assets/stylesheets directory can be referenced here using a relative path. * * You're free to add application-wide styles to this file and they'll appear at the bottom of the * compiled file so the styles you add here take precedence over styles defined in any other CSS/SCSS * files in this directory. Styles in this file should be added after the last require_* statement. * It is generally better to create a new file per style scope. * *= require bootstrap/dist/css/bootstrap *= require_tree . *= require_self */
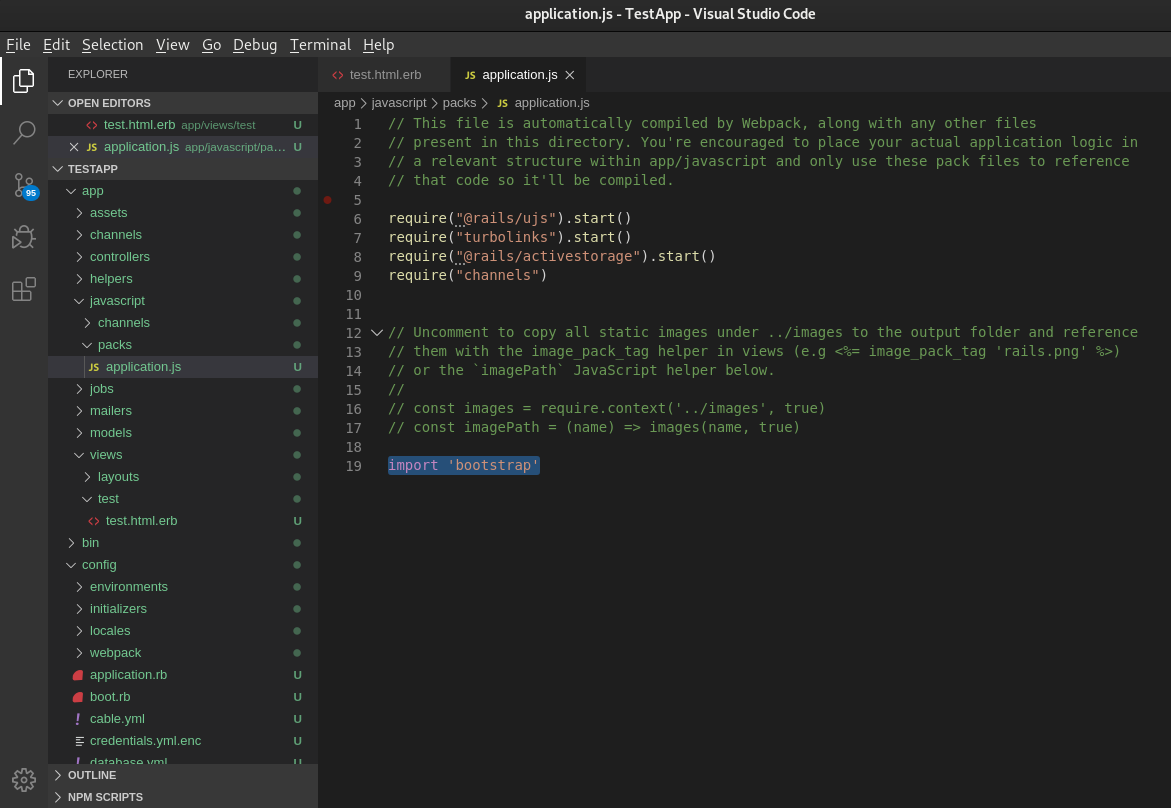
// This file is automatically compiled by Webpack, along with any other files // present in this directory. You're encouraged to place your actual application logic in // a relevant structure within app/javascript and only use these pack files to reference // that code so it'll be compiled.
// Uncomment to copy all static images under ../images to the output folder and reference // them with the image_pack_tag helper in views (e.g <%= image_pack_tag 'rails.png' %>) // or the `imagePath` JavaScript helper below. // // const images = require.context('../images', true) // const imagePath = (name) => images(name, true)
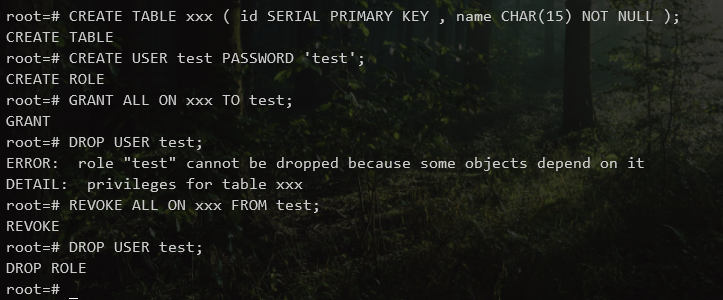
root=# CREATE TABLE xxx ( id SERIAL PRIMARY KEY , name CHAR(15) NOT NULL ); CREATE TABLE root=# CREATEUSER test PASSWORD 'test'; CREATE ROLE root=# GRANTALLON xxx TO test; GRANT root=# DROPUSER test; ERROR: role "test" cannot be dropped because some objects depend on it DETAIL: privileges fortable xxx
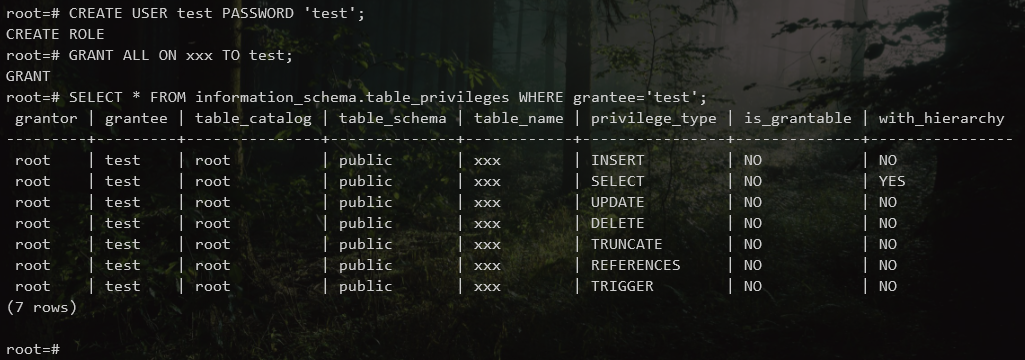
可以通过下面这条语句查询PG中“test”用户的权限,并根据查询到的结果撤销之。
1 2 3 4 5 6 7 8 9 10 11 12 13 14 15 16 17
root=# SELECT*FROM information_schema.table_privileges WHERE grantee='test'; grantor | grantee | table_catalog | table_schema | table_name | privilege_type | is_grantable | with_hierarchy ---------+---------+---------------+--------------+------------+----------------+--------------+---------------- root | test | root | public | xxx |INSERT|NO|NO root | test | root | public | xxx |SELECT|NO| YES root | test | root | public | xxx |UPDATE|NO|NO root | test | root | public | xxx |DELETE|NO|NO root | test | root | public | xxx |TRUNCATE|NO|NO root | test | root | public | xxx |REFERENCES|NO|NO root | test | root | public | xxx |TRIGGER|NO|NO (7rows)
root=# REVOKEALLON xxx FROM test; REVOKE root=# DROPUSER test; DROP ROLE root=#
批量撤销用户在数据库中所有表的权限:
1
2
revokeallon database XX from test; revokeallonall tables in schema public from test;
Open Task manager, kill explorer.exe (keep the powershell console open) Back on the prompt, type: cd $Env:localappdata\Packages\Microsoft.Windows.StartMenuExperienceHost_cw5n1h2txyewy If the previous command succesfully put you on AppData\Local\Packages\Microsoft.Windows.StartMenuExperienceHost_cw5n1h2txyewy directory inside your profile dir, then run: Remove-Item -Recurse -Force .\TempState\ Start explorer.exe back up from task manager (File -> New Task) The rogue start menu item should be gone.